This two day seminar (Sat Aug 5th and Sun Aug 6th) was well worth the monetary and time investment. I was curious after seeing and working with Stacy nearly 2 and a half years ago now to know what she would present to us this time. It was a very useful and rich mix of foundation training skills and exercises combined with some high level handling skills.
On the Saturday we set up a fairly Masters level agility course containing all the contacts, the weavers and around 20 obstacles. At 8.30am Stacy asked us all to walk it and then run it how we would in a competition – no treats, no toys first run of the trial type scenario. This was used as an evaluating exercise really on her behalf so that she could see what level we were running at. After each run Stacy usually had a few questions for each of the handlers regarding their contact cues but other than that she waited till we had all run and then gave us her honest and frank assessment.
After observing to us that we all had some good handling skills, that we had trained our dogs well particularly on the weavers and that we all in general had very motivated dogs and also that it was great to see the progress from the last time she was here (I have to do a small brag here – Stacy remembered Raven from 2 and half years ago and her jumping issues – she asked me before we ran “Is this the dog with jumping issues?...So how are they now?” I gave the guarded reply of that Raven had improved adding that she might possibly still knock every bar down! Raven was fantastic the whole day – she only knocked about three bars in the afternoon’s exercises but all morning she kept every bar up!) Stacy then gave us her thoughts on our areas of weakness, the first one being that she was unable to clearly tell from our runs for most of us what our criteria was for contacts, they were all over the shop, some were clearly two on two off, some looked like they might be running contacts but she wasn’t sure and that we were not showing any consistency from one contact to another with the behaviours we wanted from our dogs. The second bigger issue she felt was our choices on course about where we cross and what cross we were using. It looked to her like we were not very logical or consistent in deciding where our crosses should be and of course she observed much room for improvement in terms of how our bodies were executing the crosses.
So the first thing she discussed with us was the contact training and criteria that we had. She picked on a couple of dogs to show exactly how ‘untrained’ their contacts were and she made it clear that by no means was this example limited to these two it was just that they were good for demonstrating what she was talking about. Independent contacts are not about being able to send your dog on up and over an a frame and have that dog hold that 2 on 2 off position until the handler catches up (although that is a tool you will use at some point) – independent contacts are about your dog absolutely knowing without a doubt what that bottom behaviour on a contact is and driving to that same point every single time irrespective of where you are standing or running to on a course. Not only that though – the dog must perform this behaviour to 200% in training because in trialling she knows that 95% is probably the best she is going to get. No matter what we will NEVER be able to duplicate the atmosphere and environment of a trial no matter how many Show N Goes we try and do. It’s simple – we are not the same at Show N Goes as we are at trials so why should we expect that a dog will not notice the difference and behave differently according to their environment. So she asked what the majority of people were using with their contacts – we replied with two on two off for most of us. Stacy said that from our performances just now she wasn’t sure what we were wanting and that in itself spoke volumes about how closely we were adhering to our criteria *not very close*! She broke her contact training down into bit by bit and explained all the baby steps she used along the way to get the behaviour. A discussion ensued about what the value was in using two verbal cues over just one cue (ie Go “Climb” and then “Touch” versus just “Climb”). Stacy explained that from her point of view the contact obstacles really have two actions – that is the dog has to negotiate the obstacle and then the dog has to complete the ‘bottom’ behaviour. She felt that the obstacle name (Climb, Walkon, Teeter, Seesaw, AFrame etc) was not as crucial as the cue for the bottom behaviour (Touch, Stop, Contact etc) however she herself still prefers to use the two verbals together. One reason she prefers it this way is because she feels that she should be giving the dog as much information as possible re the direction they’re going, as well as that was just what she felt comfortable with. It also helped delineate between obstacles when the contact behaviour contrast (ie dogwalk may be “touch” for two on two off and Seesaw could be “stop” for driving to the end and stopping with all four on.)
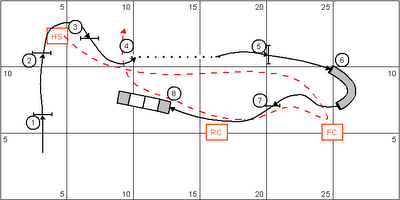
Above is the Masters course that Stacy asked us to do. It then got broken up into section by section. We did obstacles 1 through to 8 to start with. When I did this I did a lead out to the left hand side of the #3 upright, I called Raven over #1 and #2 with my left hand out pointing at the jumps as she committed to #2 I brought my right hand up to indicate a steady over #2 as we were doing a turn I wrapped her round my left leg and she took jump #3 immediately after the wrap. She then went straight in the weavers when I started to move directly towards them. I front crossed and met her at the exit of tunnel #6 got her in close to my right side so she spliced #7 and then basically rear crossed as she went up the a frame. See diagram below the red dotted line representing my path;
I thought we’d managed it quite well however there were other ways to do the start – some handlers did a lead out a meter or so past #3 but in between #2 and #3. They did a lead out pivot move here, some others did just a simple shoulder pull, some others did a full front cross. Stacy wanted us to shape the line from #1 to #2 in order to make the turn from #2 to #3 as efficient as possible as well as to encourage the speed off the start. By shaping the line and wrapping the dog around your left leg between #1 and #2 it had a sling shot effect on their speed. See the diagram below;
I decided I really didn’t need to do the front cross between 6 and 7 (I had the vague idea that it may tighten Raven’s line to #7 but when I did it the way most people handled it; a slight RFP and then let go, this was actually the smoothest and undoubtedly quickest line for her). Handling from #8 to #9 certainly made us appreciate those independent contact performances. This also brought up the observation by Stacy that we don’t practice our quick releases enough in training. I have recently been of the mindset; do a 150 contacts in training each week where you proof the hell out of the position and reward heavily. For example in training each week I will load up the pockets with treats and I will ask for the 2on2off position every contact Raven does while I fly by running at full tilt, then I’ll do send away contacts, I’ll do contacts where I run with her and then stop dead half way along the dogwalk while she carries on to the position, throw food on the ground, have toys lying nearby etc anything I can think of to proof her driving to that position and holding it until I release her I will do during the week. Every successful contact she does I will run in and reward her with multiple treats one after the other up to 6 times. I figure that by doing this I’ll get those contact behaviours to hold up for most of her runs if not all of her runs at trials on the weekends. By ‘hold up’ I don’t mean the full 2on 2off behaviour I mean enough to get me slight pauses in the contact area, sometimes running into the area, sometimes enough of a propping type movement for her to hit the contact. This is, *I know*, a very haphazard way of training and trialling her contact behaviour, therefore I accept the occasional missed contact. I’ve kept records her stats this year are that she hits her contacts 90% of her runs. I’m thinking 10% missed contacts is certainly acceptable given her handler’s training technique but not ideal. Hence my younger boy at 22 months has missed *one* A Frame contact and *one* Dogwalk contact since he started trialling at 18 months (51 runs). But I digress – having a dog that hits the contact area/position and holds it until released is always going to be the best option when it comes to trialling and desirable contact behaviours. However as Stacy said “How often do we practice quick releases in training?” Getting that timing right is crucial and ensuring that the dog recognises that release word straight away is vital. Stacy recommended that when we train our contacts that sure we should be proofing the position using distance and movement and everything else however we should also be training like we trial and part of that is getting those quick releases polished up to the point where the dog is in the colour and is gone. In training do several proofing the behaviour contacts but then throw in a quick release one as well. Don’t do them repetitively or too many times throughout a training sessions but definitely include them. We did have a couple of dogs feel that they were being tested and needed a few repeats of their verbal release before they would leave the obstacle. It also showed that sometimes people were not consistent with their release cue – sometimes the dogs were releasing on various cues (obstacle name, the cue to ‘jump’, the ‘go on’ cue etc etc).
This leads into what Stacy wanted us to do between obstacles #8, #9 and #10. The majority of us when we first handled this course stayed fairly close to the a frame, ran to #9 with our dogs on the left and pulled the dog’s into the #10 seesaw and rear crossed on this obstacle. Here we learnt that Stacy very rarely rear crosses on contact obstacles and she stated that she only does it when it is a last resort option or when she is forced to. Her reasoning for this was that these are control points on the course and the dogs momentum has to be slowed already for them to negotiate them successfully so why should we make these obstacle performances even slower by rear crossing on them? Good question and again it led me to reflect that so often when handlers run fast dogs they rarely think about the dogs speed and momentum. We really think it is one of those things we never have to think about because with fast dogs we never worry about making time – it is time to start really embracing this fairly new mindset for us – this concept of when you have a fast dog you should be out there to try and get the fastest time on that course and not just go clear. Take it to the next level – ok so you don’t have to worry about making time, irrespective of this you should always consider your handling from the viewpoint “Am I slowing my dog down *unnecessarily*?”. A rear cross on a seesaw is probably going to do that.
So that said she wanted us to trust our dogs to do their contacts on the a frame move laterally away from the a frame and get a front cross in between #9 jump and the #10 seesaw. Every single on of us got there without any problems at all. The only issues we had were a few missed contacts, some handlers moving their shoulders into the turn too early causing the dog to go on the inside of the jump and of course the old late signal causing the dog to take #9 in an extended style over the middle of the bar and wasting time covering the wide turn. After we all had a few goes at this though we were all handling this section to a very high level.
The diagram above shows where we did the front cross to get the dogs to turn over jump #9 and head towards the seesaw. Next a discussion about how to handle jumps #11 to #12 and to #13. Initially it was handled by us in several different ways. Some people pushed the dog out to take the #12 jump and the just rear crossed on #13, others did a front cross between #11 and #12, and a few did a front cross at #12 and did a shoulder pull to bring the dog into #14 and they rear crossed further up on the course. Stacy asked us for the front cross at #12 and then a front cross between #14 and #15. Most of us could do the front cross at #12 without any problems, a few of us (myself included) had a problem getting the cross between #14 and #15 to work. What was happening is we either left the cross too late and dogs were flying over #13 so extended they went over #20, or people were so intent on getting there for the cross they didn’t support the dog to take #13 and so the dogs pulled off #13 and came towards the handler. Another issue I had was I’d be trying to turn before I was in the right spot and I just have Raven whip past me on the wrong side of me as she knew there was another jump behind me and must have thought her line was far more efficient than the awkward S shape line I was trying to make her take LOL! This whole section between #13 and #15 felt quite uncoordinated for me. Really only a few handlers mastered this to a high level. It was a fine line between pushing too far to #13 (over supporting the dog) and not pushing enough. I felt that I wasn’t getting a very tight turn over #13 and also that it felt really odd to be right in the middle of her path over #14 doing a cross. I started doing this weird movement where I felt the she was so close to crashing into me that I had to do a quick shift of my weight onto my toes – don’t ask me what that was in aid of, it really made no sense! It was a handling choice though that done smoothly as a few of us managed to do, looked extremely efficient and quick. Definitely a sequence to work on and perfect.
Numbers 15 through to 18 were not an issue for me but several handlers had problems with their dogs finding the walk, some of them pushed too far and sent their dogs into the tunnel on the outside of the walk and others over compensated for the left turn and actually pulled their dogs into the tunnel at the other end. Really I did not see it as any push out needed at all – our body positions at that stage meant that the dogs would have been far enough away already due to their momentum over jumps #15 and #16. I think where you started to turn your shoulders definitely had an impact on whether they took the walk or the tunnel. In situations like this though I prefer to not even consider that a tunnel is there. After Stacy had given some handlers advice on where they should move and when they should be turning we were all handling this finding the dogwalk challenge with ease. Stacy interestingly enough wanted us to do a front cross at the end of the dogwalk to push the dogs into the #18 tunnel. I don’t think anyone did this the first time they ran the course, I’m not sure but I think there were a few off courses into the wrong end of the tunnel when we first ran it. I chose to shoulder pull and it worked fine. I’m guessing for those it didn’t work for either the dog had been focusing in on the wrong tunnel entry anyway coming down the dogwalk and would have taken it regardless of how good the shoulder pull was or the handler was a little less definite than they should have been when it came to the shoulder pull move. Either way the handler can fix this. However Stacy wanted the front cross and then another front cross before the final tunnel #21.
See the diagram below;
I think the trickiest part for us was A: Remembering to stand and wait for the dogs to come out of the tunnel ensuring that we grabbed their attention straight away – if we ran off on them too soon some would go up the dogwalk again and others would go straight past #19. and B: Getting that front cross smooth between #20 and #21. It was again a front cross that put you in the dog’s path (a very foreign feeling for that to happen on the move – quite different from when you shape the dogs path at a lead out). It took a few repetitions but most of us succeeded at this one.
So at the end of Saturday we ran the whole course using the handling approaches we had practiced. It was good to see how much progress we’d made from being completely uncomfortable with some moves to being quite proficient in executing them. Stacy finished with why she prefers the front cross to the rear cross the majority of the time on courses. Basically you have more chance to speed your dog up from in front than you do from behind and that front crosses whenever you need to turn a dog or change your side should be your first choice or handling options. Rear crosses are often performed below par and frequently rely on the handler slowing down to perform them. Stacy’s attitude when people ask about what if you are unsure if you can get to where you need to be is to be positive about doing your utmost to get there and then if you know at the last second that you are not going to make it – it will turn into the best rear cross you can do, because then you have that back up option. Whereas if you just make your mind up to do the rear cross only then if your’s dog’s momentum and drive or your position is out of place and doing a rear cross is not going to work you just end up, if you’re lucky, with a rear cross that just misses being called a fault with a lot of wasted time and at the worst a complete refusal call. I really warmed to this idea and I am going to endeavour to walk courses keeping that type of approach to handling foremost in my mind. Stay tuned...Day TWO coming soon!


No comments:
Post a Comment